Appearance
Spring Cloud 微服务
Spring Boot 和 Spring Cloud 为 Java 开发者提供了一条从开发传统的单体的 Spring 应用到开发可以部署在云端的微服务应用的迁移路径。
什么是微服务
微服务的概念最初是在 2014 年前后悄悄蔓延到软件开发社区的意识中,它是对在技术上和组织上扩大大型单体应用程序所面临的诸多挑战的直接回应。记住,微服务是一个小的、松耦合的分布式服务。微服务允许将一个大型的应用分解为具有严格职责定义的便于管理的组件。微服务通过将大型代码分解为小型的精确定义的部分,帮助解决大型代码库中传统的复杂问题。在思考微服务时,一个需要信奉的重要概念就是:分解和分离应用程序的功能,使它们完全彼此独立。
微服务架构具有以下特征:
应用程序逻辑分解为具有明确定义了职责范围的细粒度组件,这些组件互相协调提供解决方案。
每个组件都有一个小的职责领域,并且完全独立部署。微服务应该对业务领域的单个部分负责。此外,一个微服务应该可以跨多个应用程序复用。
微服务通信基于一些基本的原则(注意,是原则而不是标准),并采用 HTTP 和 JSON(JavaScript Object Notation)这样的轻量级通信协议,在服务消费者和服务提供者之间进行数据交换。
服务的底层采用什么技术实现并没有什么影响,因为应用程序始终使用技术中立的协议(JSON 是最常见的)进行通信。这意味着构建在微服务之上的应用程序能够使用多种编程语言和技术进行构建。
微服务利用其小、独立和分布式的性质,使组织拥有明确责任领域的小型开发团队。这些团队可能为同一个目标工作,如交付一个应用程序,但是每个团队只负责他们在做的服务。
什么是 Spring,为什么它与微服务有关
在基于 Java 的应用程序构建中,Spring 已经成为了事实上的标准开发框架。Spring 的核心是建立在依赖注入的概念上的。依赖注入框架(如 Spring),允许用户通过约定(以及注解)将应用程序对象之间的关系外部化,而不是在对象内部彼此硬编码实例化代码,以便更轻松地管理大型 Java 项目。Spring 在应用程序的不同的 Java 类之间充当一个中间人,管理着它们的依赖关系。
Spring 团队发现,许多开发团队正在从将应用程序的展现、业务和数据访问逻辑打包在一起并部署为单个制品的单体应用程序模型中迁移,正转向高度分布式的模型,服务能够被构建成可以轻松部署到云端的小型分布式服务。为了响应这种转变,Spring 开发团队启动了两个项目,即 Spring Boot 和 Spring Cloud。
Spring Boot 是对 Spring 框架理念重新思考的结果。虽然 Spring Boot 包含了 Spring 的核心特性,但它剥离了 Spring 中的许多“企业”特性,而提供了一个基于 Java 的、面向REST [1] 的微服务框架。只需一些简单的注解,Java 开发者就能够快速构建一个可打包和部署的 REST 微服务,这个微服务并不需要外部的应用容器。
在构建基于云的应用时,微服务已经成为更常见的架构模式之一,因此 Spring 社区为开发者提供了 Spring Cloud。Spring Cloud 框架使实施和部署微服务到私有云或公有云变得更加简单。Spring Cloud 在一个公共框架之下封装了多个流行的云管理微服务框架,并且让这些技术的使用和部署像为代码添加注解一样简便。
使用 Spring Cloud 构建微服务
从零开始实现所有这些模式将是一项巨大的工作。幸好,Spring 团队将大量经过实战检验的开源项目整合到一个称为 Spring Cloud 的 Spring 子项目中。
Spring Cloud 将 Pivotal、HashiCorp 和 Netflix 等开源公司的工作封装在一起。Spring Cloud 简化了将这些项目设置和配置到 Spring 应用程序中的工作,以便开发人员可以专注于编写代码,而不会陷入配置构建和部署微服务应用程序的所有基础设施的细节中。
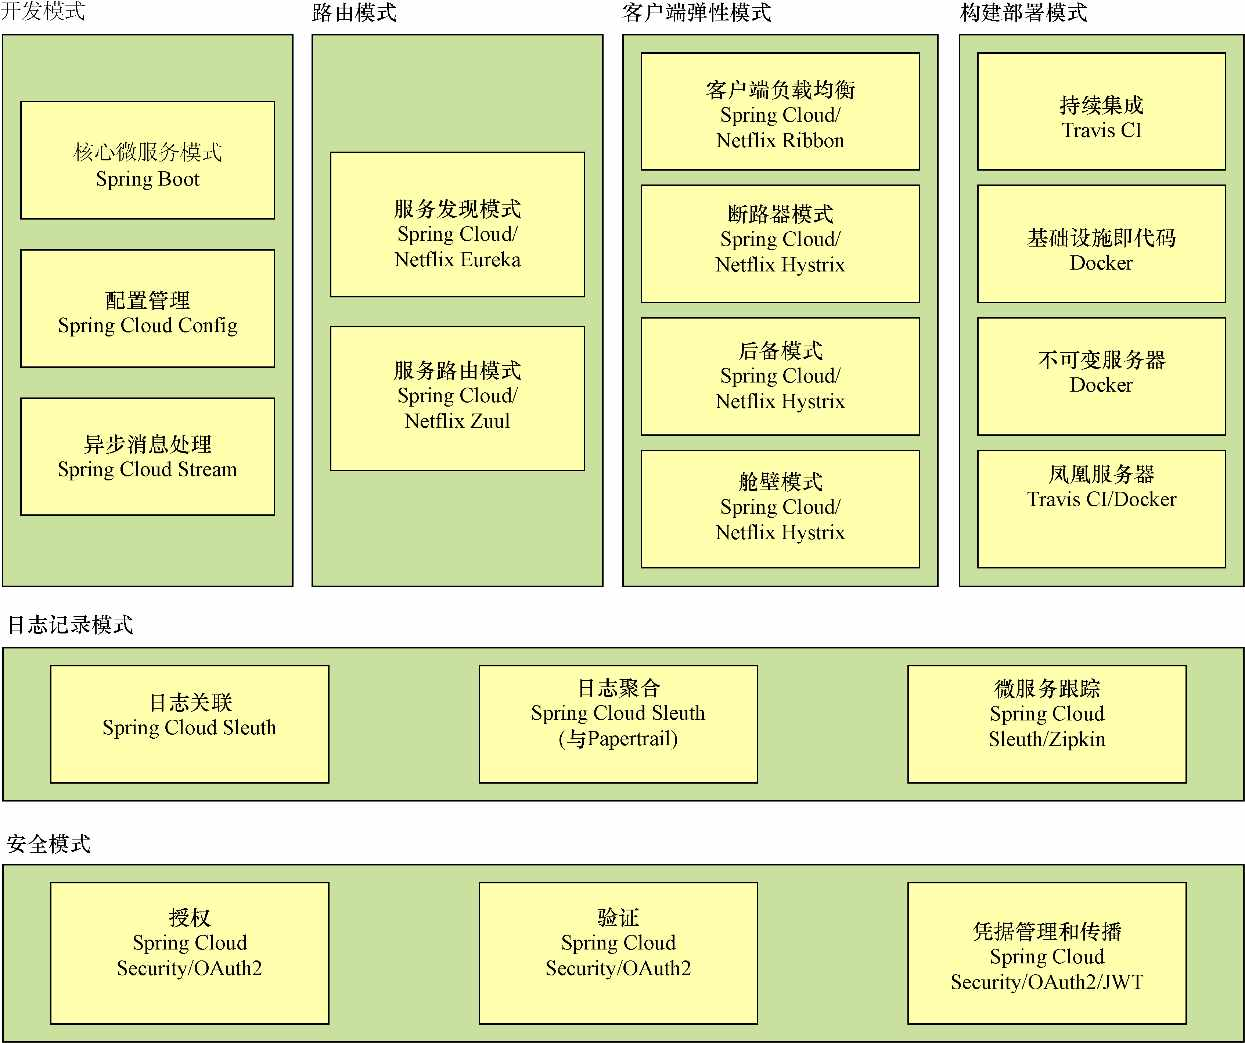
(图片来源:Spring 微服务实战)
下面让我们更详细地了解一下这些技术。
Spring Boot
Spring Boot 是微服务实现中使用的核心技术。Spring Boot 通过简化构建基于 REST 的微服务的核心任务,大大简化了微服务开发。Spring Boot 还极大地简化了将 HTTP 类型的动词(GET、PUT、POST 和 DELETE)映射到URL、JSON 协议序列化与 Java 对象的相互转化,以及将 Java 异常映射回标准 HTTP 错误代码的工作。
Spring Cloud Config
Spring Cloud Config 通过集中式服务来处理应用程序配置数据的管理,因此应用程序配置数据(特别是环境特定的配置数据)与部署的微服务完全分离。这确保了无论启动多少个微服务实例,这些微服务实例始终具有相同的配置。Spring Cloud Config 拥有自己的属性管理存储库,也可以与以下开源项目集成。
Git —— Git 是一个开源版本控制系统,它允许开发人员管理和跟踪任何类型的文本文件的更改。Spring Cloud Config 可以与 Git 支持的存储库集成,并读出存储库中的应用程序的配置数据。
Consul —— Consul 是一种开源的服务发现工具,允许服务实例向该服务注册自己。服务客户端可以向Consul 咨询服务实例的位置。Consul 还包括可以被 Spring Cloud Config 使用的基于键值存储的数据库,能够用来存储应用程序的配置数据。
Eureka —— Eureka 是一个开源的 Netflix 项目,像 Consul 一样,提供类似的服务发现功能。Eureka 同样有一个可以被 Spring Cloud Config 使用的键值数据库。
Spring Cloud 服务发现
通过 Spring Cloud 服务发现,开发人员可以从客户端消费的服务中抽象出部署服务器的物理位置(IP 或服务器名称)。服务消费者通过逻辑名称而不是物理位置来调用服务器的业务逻辑。Spring Cloud 服务发现也处理服务实例的注册和注销(在服务实例启动和关闭时)。Spring Cloud 服务发现可以使用 Consul 和 Eureka 作为服务发现引擎。
Spring Cloud 与 Netflix Hystrix 和 Netflix Ribbon
Spring Cloud 与 Netflix 的开源项目进行了大量整合。对于微服务客户端弹性模式,Spring Cloud 封装了Netflix Hystrix 库和 Netflix Ribbon 项目,开发人员可以轻松地在微服务中使用它们。
使用 Netflix Hystrix 库,开发人员可以快速实现服务客户端弹性模式,如断路器模式和舱壁模式。
虽然 Netflix Ribbon 项目简化了与诸如 Eureka 这样的服务发现代理的集成,但它也为服务消费者提供了客户端对服务调用的负载均衡。即使在服务发现代理暂时不可用时,客户端也可以继续进行服务调用。
Spring Cloud 与 Netflix Zuul
Spring Cloud 使用 Netflix Zuul 项目为微服务应用程序提供服务路由功能。Zuul 是代理服务请求的服务网关,确保在调用目标服务之前,对微服务的所有调用都经过一个“前门”。通过集中的服务调用,开发人员可以强制执行标准服务策略,如安全授权验证、内容过滤和路由规则。
Spring Cloud Stream
Spring Cloud Stream(https://spring.io/projects/spring-cloud-stream/)是一种可让开发人员轻松地将轻量级消息处理集成到微服务中的支持技术。借助 Spring Cloud Stream,开发人员能够构建智能的微服务,它可以使用在应用程序中出现的异步事件。此外,使用 Spring Cloud Stream 可以快速将微服务与消息代理进行整合,如 RabbitMQ 和 Kafka。
Spring Cloud Sleuth
Spring Cloud Sleuth 允许将唯一跟踪标识符集成到应用程序所使用的 HTTP 调用和消息通道(RabbitMQ、Apache Kafka)之中。这些跟踪号码(有时称为关联 ID 或跟踪 ID)能够让开发人员在事务流经应用程序中的不同服务时跟踪事务。有了 Spring Cloud Sleuth,这些跟踪 ID 将自动添加到微服务生成的任何日志记录中。
Spring Cloud Sleuth 与日志聚合技术工具(如 Papertrail)和跟踪工具(如 Zipkin)结合时,能够展现出真正的威力。Papertail 是一个基于云的日志记录平台,用于将日志从不同的微服务实时聚合到一个可查询的数据库中。Zipkin 可以获取 Spring Cloud Sleuth 生成的数据,并允许开发人员可视化单个事务涉及的服务调用流程。
Spring Cloud Security
Spring Cloud Security 是一个验证和授权框架,可以控制哪些人可以访问服务,以及他们可以用服务做什么。Spring Cloud Security 是基于令牌的,允许服务通过验证服务器发出的令牌彼此进行通信。接收调用的每个服务可以检查 HTTP 调用中提供的令牌,以确认用户的身份以及用户对该服务的访问权限。
此外,Spring Cloud Security 支持 JSON Web Token。JSON Web Token(JWT)框架标准化了创建 OAuth2 令牌的格式,并为创建的令牌进行数字签名提供了标准。
使用 Spring Cloud 配置服务器控制配置
先来看一下几个不同的方案选择,并对它们进行比较。
| 项目名称 | 描述 | 特点 |
|---|---|---|
| Etcd | 使用 Go 开发的开源项目,用于服务发现和键值管理,使用 Raft 协议作为它的分布式计算模型 | 非常快和可伸缩 可分布式 命令行驱动 易于搭建和使用 |
| Eureka | 由 Netflix 开发。久经测试,用于服务发现和键值管理 | 分布式键值存储 灵活,需要费些功夫去设置 提供开箱即用的动态客户端刷新 |
| Consul | 由 Hashicorp 开发,特性上类似于 Etcd 和 Eureka,它的分布式计算模型使用了不同的算法(SWIM 协议) | 快速 提供本地服务发现功能,可直接与 DNS 集成 没有提供开箱即用的动态客户端刷新 |
| ZooKeeper | 一个提供分布式锁定功能的 Apache 项目,经常用作访问键值数据的配置管理解决方案 | 最古老的、最久经测试的解决方案 使用最为复杂 可用作配置管理,但只有在其他架构中已经使用了 ZooKeeper 的时候才考虑使用它 |
| Spring Cloud Config | 一个开源项目,提供不同后端支持的通用配置管理解决方案。它可以将 Git、Eureka 和 Consul 作为后端进行整合 | 非分布式键值存储 提供了对 Spring 和非 Spring 服务的紧密集成 可以使用多个后端来存储配置数据,包括共享文件系统、Eureka、Consul 和 Git |
表中的所有方案都可以轻松用于构建配置管理解决方案。选择 Spring Cloud Config 出于多种原因,其中包括以下几个。
Spring Cloud 配置服务器易于搭建和使用。
Spring Cloud 配置与 Spring Boot 紧密集成。开发人员可以使用一些简单易用的注解来读取所有应用程序的配置数据。
Spring Cloud 配置服务器提供多个后端用于存储配置数据。如果已经使用了 Eureka 和 Consul 等工具,那么可以将它们直接插入 Spring Cloud 配置服务器中。
Spring Cloud 配置服务器可以直接与 Git 源控制平台集成。Spring Cloud 配置与 Git 的集成消除了解决方案的额外依赖,并使版本化应用程序配置数据成为可能。
其他工具(Etcd、Consul、Eureka)不提供任何类型的原生版本控制,如果开发人员想要版本控制的话,则必须自己去建立它。
构建 Spring Cloud 配置服务器
Spring Cloud 配置服务器是基于 REST 的应用程序,它建立在 Spring Boot 之上。Spring Cloud 配置服务器不是独立服务器,相反,我们可以选择将它嵌入现有的 Spring Boot 应用程序中,也可以在嵌入它的服务器中启动新的 Spring Boot 项目。
首先需要做的是使用 Spring Initializer 建立一个名为 config-server 的新项目,里面包含启动 Spring Cloud 配置服务器所需的依赖 spring-cloud-config-server。
xml
<dependency>
    <groupId>org.springframework.cloud</groupId>
    <artifactId>spring-cloud-config-server</artifactId>
</dependency>
接着在 config-server 的启动类上添加 @EnableConfigServer 注解。
java
@EnableConfigServer
@SpringBootApplication
public class ConfigServerApplication {

	public static void main(String[] args) {
		SpringApplication.run(ConfigServerApplication.class, args);
	}

}
使用 8888 端口。
properties
server.port=8888试着启动配置服务器,出现下面的日志信息。
sh
***************************
APPLICATION FAILED TO START
***************************

Description:

Invalid config server configuration.

Action:

If you are using the git profile, you need to set a Git URI in your configuration. If you are using a native profile and have spring.cloud.config.server.bootstrap=true, you need to use a composite configuration.想想也是,既然是配置服务器,肯定需要有配置数据。我们可以选择从网络(Git)或本地(Native)加载配置数据。
使用带有文件系统的 Spring Cloud 配置服务器
使用 Native 的方式加载配置数据。下面是一个示例。
在 src/main/resources/ 目录下新建 configdata 目录,新建 3 个配置文件(configdata.yml、configdata-dev.yml、configdata-prod.yml),文件内容分别如下:
configdata.yml
ymlexample: property: "我是 DEFAULT 文件里的"configdata-dev.yml
ymlexample: property: "我是 DEV 文件里的"configdata-prod.yml
ymlexample: property: "我是 PROD 文件里的"
配置文件存储位置的路径:
properties
# 绝对路径
spring.cloud.config.server.native.search-locations=file:///E:/eclipse-workspace/SpringCloudSamples/config-server/src/main/resources/configdata

# 相对路径
spring.cloud.config.server.native.search-locations=classpath:configdata
Spring Cloud 配置的 application.properties 文件:
properties
# Spring Cloud 配置服务器将要监听的端口
server.port=8888

# 用于存储配置的后端存储库(文件系统)
spring.profiles.active=native

# 配置文件存储位置的路径
spring.cloud.config.server.native.search-locations=classpath:configdata
启动配置服务器,用浏览器访问 http://localhost:8888/configdata/default,会出现下面的 JSON 信息,其中包含了 configdata.yml 文件中的属性。
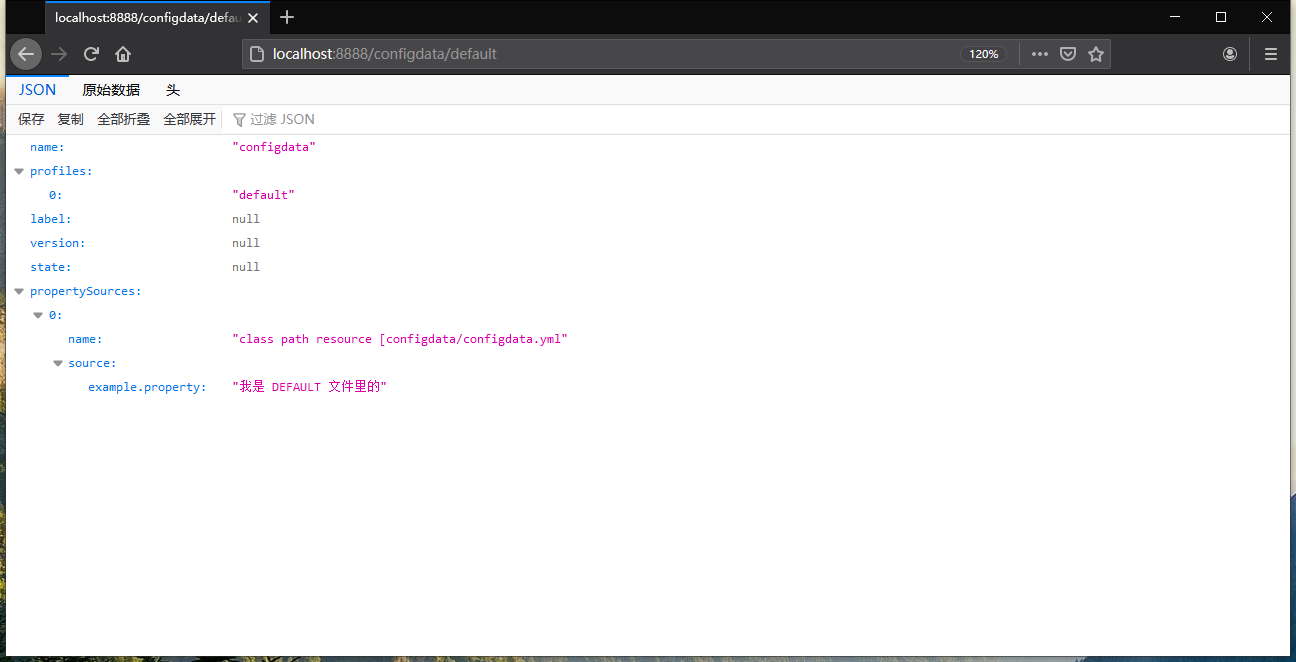
(configdata 的默认配置信息。图片来源,自己截得)
访问开发环境的配置数据,地址是 http://localhost:8888/configdata/dev。
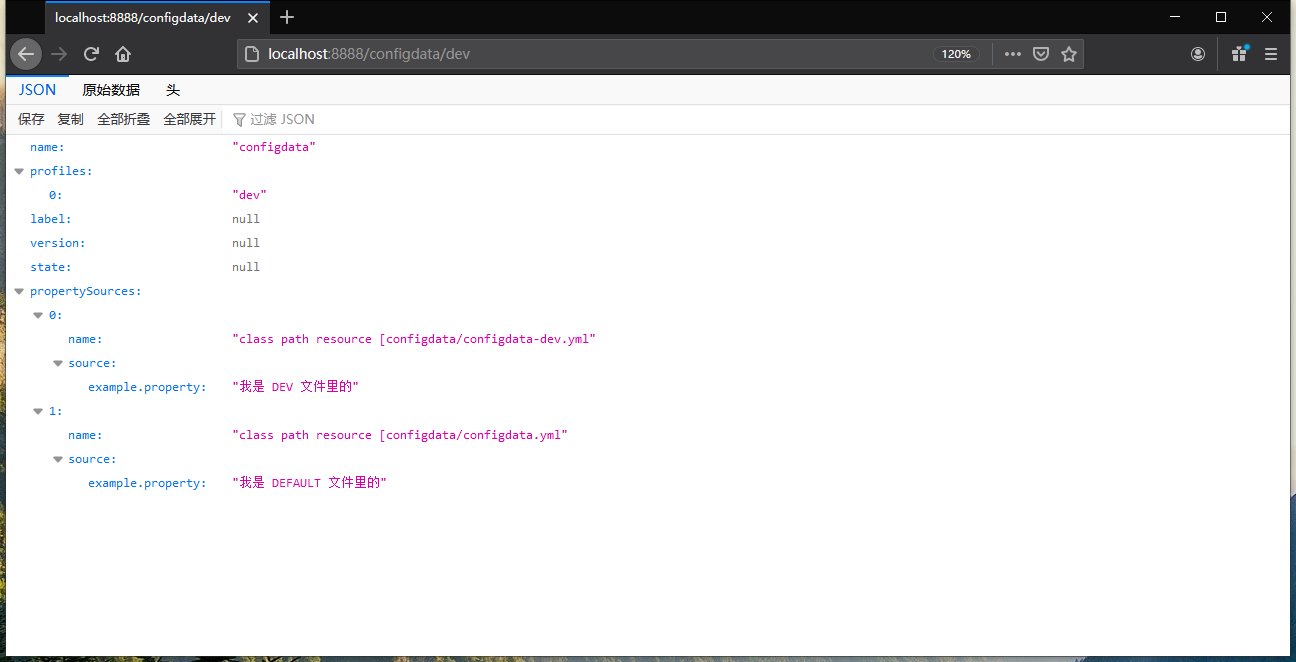
(configdata 的开发环境配置信息。图片来源,自己截得)
如果仔细观察,会看到在访问开发环境站点时,将返回默认配置以及开发环境下的服务配置。Spring Cloud 配置返回两组配置信息的原因是,Spring 框架实现了一种用于解析属性的层次结构机制。当 Spring 框架执行属性解析时,它将始终先查找默认属性中的属性,然后用特定环境的值(如果存在)去覆盖默认属性。
控制台日志也有体现:
sh
2020-12-30 11:46:40.962  INFO 2216 --- [nio-8888-exec-4] o.s.c.c.s.e.NativeEnvironmentRepository  : Adding property source: class path resource [configdata/configdata-dev.yml
2020-12-30 11:46:40.963  INFO 2216 --- [nio-8888-exec-4] o.s.c.c.s.e.NativeEnvironmentRepository  : Adding property source: class path resource [configdata/configdata.yml
具体来说,如果在 configdata.yml 文件中定义一个属性,并且不在任何其他环境配置文件(如 configdata-dev.yml)中定义它,则 Spring 框架将使用这个默认值。
使用带有 Git 的 Spring Cloud 配置服务器
使用文件系统作为 Spring Cloud 配置服务器的后端存储库,对基于云的应用程序来说是不切实际的,因为开发团队必须搭建和管理所有挂载在云配置服务器实例上的共享文件系统。
下面是一个使用 Git 的方式加载配置数据的示例。
Spring Cloud 配置的 application.properties 文件:
properties
# Spring Cloud 配置服务器将要监听的端口
server.port=8888

# 用于存储配置的后端存储库(默认是 git,可以不写)
spring.profiles.active=git

# 配置文件存储位置的 Git 存储库 URL
spring.cloud.config.server.git.uri=https://github.com/panxingcheng/SpringCloudSamples

# Git 存储库的相对路径
spring.cloud.config.server.git.search-paths=config-server/src/main/resources/configdata

# Git 存储库的账号和密码
spring.cloud.config.server.git.username=username
spring.cloud.config.server.git.password=password
下一步,使用 Spring Boot 客户端 读取 Spring Cloud 配置服务器上的配置数据。
将 Spring Cloud Config 与 Spring Boot 客户端集成
新建一个名为 config-client 的 SpringBoot 项目,添加 spring-boot-starter-web 和 spring-cloud-starter-config 依赖。spring-cloud-starter-config 包含了与 Spring Cloud 配置服务器交互所需的类。
xml
<dependency>
	<groupId>org.springframework.boot</groupId>
	<artifactId>spring-boot-starter-web</artifactId>
</dependency>
<dependency>
	<groupId>org.springframework.cloud</groupId>
	<artifactId>spring-cloud-starter-config</artifactId>
</dependency>
在 application.properties 中添加以下配置:
properties
# 应用程序名称(必须与 Spring Cloud 配置服务器中的目录的名称相同)
spring.application.name=configdata

# 运行 Spring Cloud 配置服务器中的哪个 profile
spring.cloud.config.profile=default

# Spring Cloud 配置服务器的 URL
spring.config.import=optional:configserver:http://localhost:8888/
SpringBoot 2.4 及 Spring Cloud 2020.0.0 以后,Bootstrap 默认不加载
在这之前,只能通过 Bootstrap 连接到 Spring Cloud 配置服务器。
有两种方式加载 Bootstrap:
使用
spring.cloud.bootstrap.enabled=true或spring.config.use-legacy-processing=true,这些值必须放在环境变量、系统属性或命令行中才能生效。添加
spring-cloud-starter-bootstrap的依赖 JAR 包。
bootstrap.properties 的内容:
properties
# 应用程序名称(必须与 Spring Cloud 配置服务器中的目录的名称相同)
spring.application.name=configdata

# 运行 Spring Cloud 配置服务器中的哪个 profile
spring.cloud.config.profile=default

# Spring Cloud 配置服务器的 URL
spring.cloud.config.uri: http://localhost:8888/具体内容请查阅这里。
使用 @Value 注解直接读取属性
我们在 config-server 的 configdata 中设置了 example.property 这个属性。现在使用 @Value 注解读到 config-client 中并通过 Web 去访问它。
java
package study.helloworld.springcloud.configclient;

import org.springframework.beans.factory.annotation.Value;
import org.springframework.boot.SpringApplication;
import org.springframework.boot.autoconfigure.SpringBootApplication;
import org.springframework.web.bind.annotation.RequestMapping;
import org.springframework.web.bind.annotation.RestController;

@RestController
@SpringBootApplication
public class ConfigClientApplication {

	@Value("${example.property}")
	private String exampleProperty;

	@RequestMapping("/")
	public String home() {
		return "你好," + exampleProperty;
	}

	public static void main(String[] args) {
		SpringApplication.run(ConfigClientApplication.class, args);
	}

}
启动 config-client,打开浏览器访问 http://localhost:8080/:
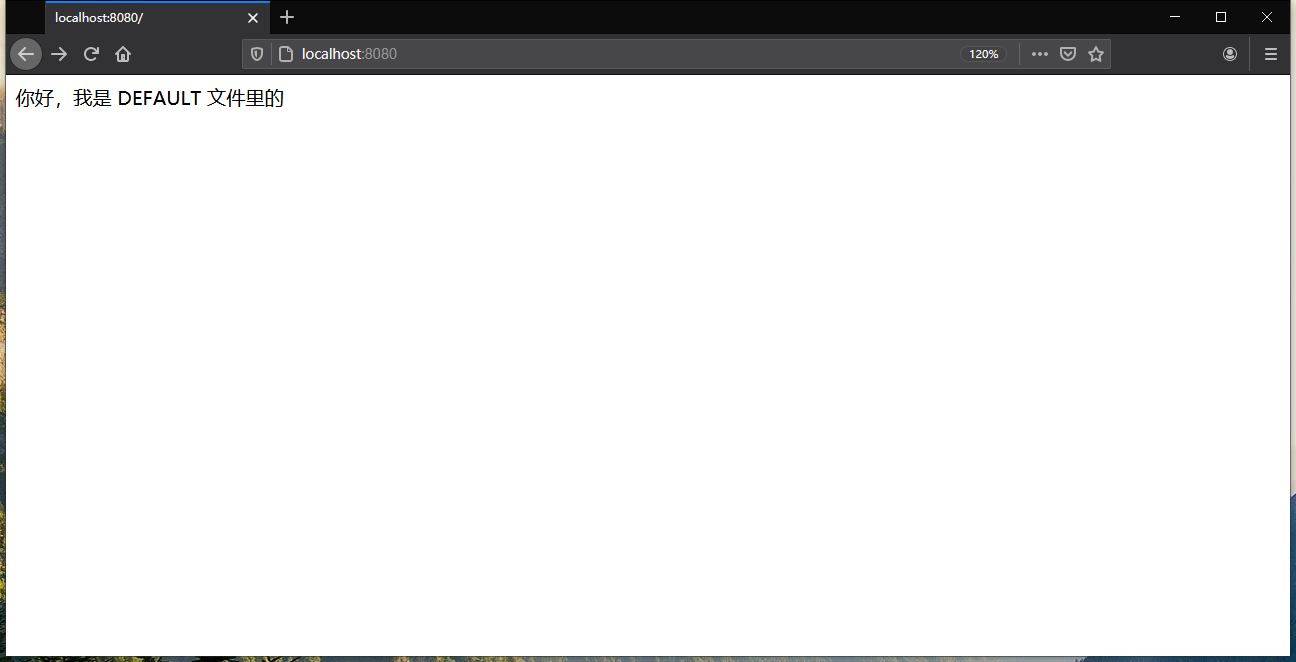
(图片来源:自己截得)
使用 Spring Cloud 配置服务器刷新属性
我们在使用 Spring Cloud 配置服务器时,遇到的第一个问题是,如何在属性变化时动态刷新应用程序。Spring Cloud 配置服务器始终提供最新版本的属性,通过其底层存储库,对属性进行的更改将是最新的。
但是,Spring Boot 应用程序只会在启动时读取它们的属性,因此 Spring Cloud 配置服务器中进行的属性更改不会被Spring Boot 应用程序自动获取。Spring Boot Actuator 提供了一个 @RefreshScope 注解,允许我们访问 /actuator/refresh 端点,这会强制 Spring Boot 应用程序重新读取应用程序配置。
使用 Spring Boot Actuator 前,需要添加 spring-boot-starter-actuator 依赖:
xml
<dependency>
	<groupId>org.springframework.boot</groupId>
	<artifactId>spring-boot-starter-actuator</artifactId>
</dependency>
放开 /refresh 端点:
properties
# 放开 /refresh 端点
management.endpoints.web.exposure.include=refresh
然后在对应的 Controller 上添加 @RefreshScope 注解:
java
package study.helloworld.springcloud.configclient;

import org.springframework.beans.factory.annotation.Value;
import org.springframework.boot.SpringApplication;
import org.springframework.boot.autoconfigure.SpringBootApplication;
import org.springframework.cloud.context.config.annotation.RefreshScope;
import org.springframework.web.bind.annotation.RequestMapping;
import org.springframework.web.bind.annotation.RestController;

@RefreshScope
@RestController
@SpringBootApplication
public class ConfigClientApplication {

	@Value("${example.property}")
	private String exampleProperty;

	@RequestMapping("/")
	public String home() {
		return "你好," + exampleProperty;
	}

	public static void main(String[] args) {
		SpringApplication.run(ConfigClientApplication.class, args);
	}

}
提示
@RefreshScope 注解只会重新加载应用程序配置中的自定义 Spring 属性。Spring Data 使用的数据库配置等不会被重新加载。
启动 config-client,打开浏览器访问 http://localhost:8080/:

(图片来源:自己截得)
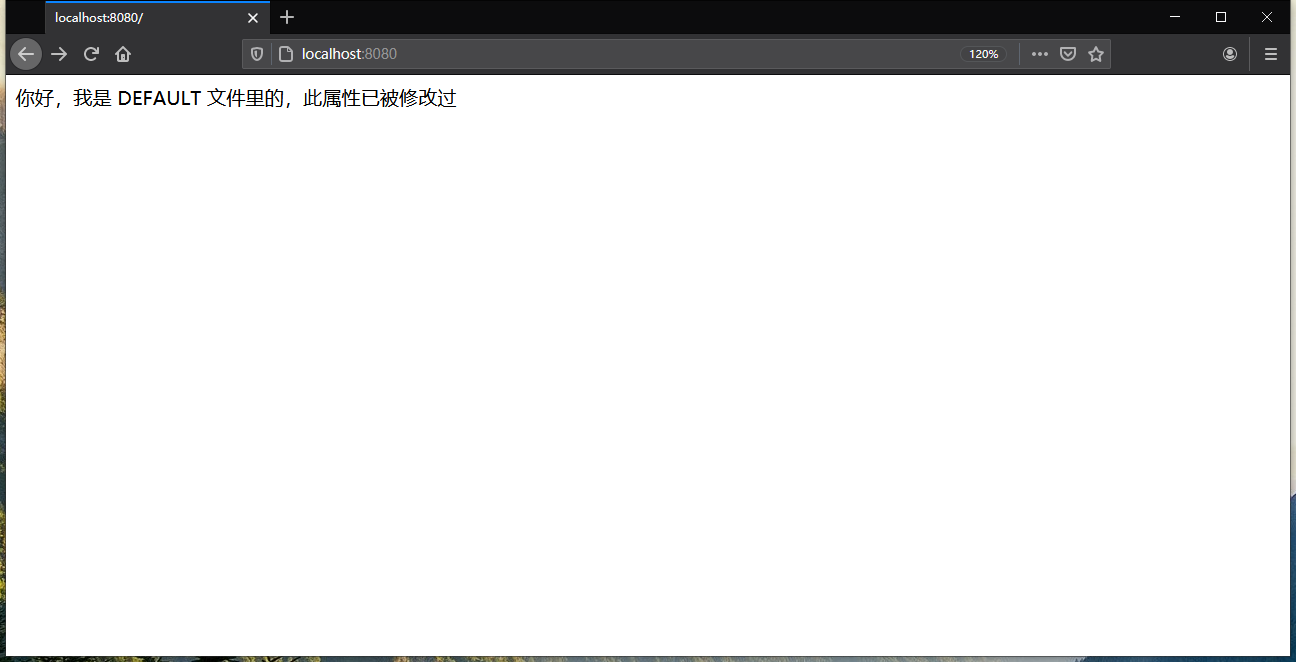
修改 config-server 里的 configdata.yml 配置文件内容:
yml
example:
  property: "我是 DEFAULT 文件里的,此属性已被修改过"
使用 POST 方式访问 http://localhost:8080/actuator/refresh 刷新配置属性后,再次打开 http://localhost:8080/:
(图片来源:自己截得)
可以看到配置属性是最新的了。
使用 Spring 和 Netflix Eureka 进行服务发现
创建一个服务发现代理来实现服务发现,然后通过代理注册两个服务。接着,通过使用服务发现检索到的信息,让一个服务调用另一个服务。
构建 Spring Eureka 服务
新建一个名为 eureka-server 的 SpringBoot 项目,添加 spring-cloud-starter-netflix-eureka-server 依赖。
xml
<dependency>
	<groupId>org.springframework.cloud</groupId>
	<artifactId>spring-cloud-starter-netflix-eureka-server</artifactId>
</dependency>
在 application.properties 中添加以下配置:
properties
# Eureka 服务器将要监听的端口(默认端口是 8761)
server.port=8761

# 不要使用 Eureka 服务进行注册(因为它本身就是 Eureka 服务)
eureka.client.register-with-eureka=false

# 不在本地缓存注册的服务信息(不从 Eureka 服务获取注册的服务信息)
eureka.client.fetch-registry=false

# Eureka 不会马上广播任何通过它注册的服务,默认情况下它会等待 5 分钟,让所有的服务都有机会在广播它们之前通过它来注册(本地开发时,设置为 0 可以加快 Eureka 服务启动和显示通过它注册服务所需的时间)
eureka.server.wait-time-in-ms-when-sync-empty=0
提示
每次服务注册需要 30 秒的时间才能显示在 Eureka 服务中,因为 Eureka 需要从服务接收 3 次连续心跳包 ping,每次心跳包 ping 间隔 10 秒,然后才能使用这个服务。在部署和测试服务时,要牢记这一点。
最后,在 eureka-server 的启动类上添加 @EnableEurekaServer 注解。
java
@EnableEurekaServer
@SpringBootApplication
public class EurekaServerApplication {

	public static void main(String[] args) {
		SpringApplication.run(EurekaServerApplication.class, args);
	}

}
通过 Spring Eureka 注册服务
现在有一个基于 Spring 的 Eureka 服务器正在运行。接着将配置 service-a 服务和 service-b 服务,以便通过 Eureka 服务器来注册它们自身。这项工作是为了让服务客户端从 Eureka 注册表中查找服务做好准备。
注册 service-a 服务
新建一个名为 service-a 的 SpringBoot 项目,添加 spring-boot-starter-web 和 spring-cloud-starter-netflix-eureka-client 依赖。spring-cloud-starter-netflix-eureka-client 包含了与 Eureka 服务器交互所需的类。
xml
<dependency>
	<groupId>org.springframework.cloud</groupId>
	<artifactId>spring-cloud-starter-netflix-eureka-client</artifactId>
</dependency>
在 application.properties 中添加以下配置:
properties
# service-a 的端口
server.port=8080

# 将使用 Eureka 注册的服务的逻辑名称
spring.application.name=service-a

# 注册服务的 IP,而不是服务器名称
eureka.instance.prefer-ip-address=true

# 向 Eureka 注册服务
eureka.client.register-with-eureka=true

# 缓存 Eureka 注册服务的列表到本地
eureka.client.fetch-registry=true

# Eureka 服务的位置
eureka.client.service-url.defaultZone=http://localhost:8761/eureka/
每个通过 Eureka 注册的服务都会有两个与之相关的组件:应用程序 ID 和实例 ID。应用程序 ID 用于表示一组服务实例。在基于 Spring Boot 的微服务中,应用程序 ID 始终是由 spring.application.name 属性设置的值。对于上述服务,spring.application.name 被命名为 service-a。实例 ID 是一个随机数,用于代表单个服务实例。
eureka.instance.prefer-ip-address 属性告诉 Eureka,要将服务的 IP 地址而不是服务的主机名注册到 Eureka。
为什么偏向于 IP 地址
在默认情况下,Eureka 在尝试注册服务时,将会使用主机名让外界与它进行联系。这种方式在基于服务器的环境中运行良好,在这样的环境中,服务会被分配一个 DNS 支持的主机名。但是,在基于容器的部署(如 Docker)中,容器将以随机生成的主机名启动,并且该容器没有 DNS 记录。
如果没有将 eureka.instance.prefer-ip-address 设置为 true,那么客户端应用程序将无法正确地解析主机名的位置,因为该容器不存在 DNS 记录。设置 eureka.instance.prefer-ip-address 属性为 true 表示将通知 Eureka 服务,客户端想要通过 IP 地址进行通告。
eureka.client.register-with-eureka 属性是一个触发器,设置为 true 可以告诉服务通过 Eureka 注册它本身。eureka.client.fetch-registry 属性用于告知 Spring Eureka 客户端以获取注册表的本地副本。将此属性设置为 true 将在本地缓存注册表,而不是每次查找服务都调用 Eureka 服务。每隔 30 秒,客户端软件就会重新联系 Eureka 服务,以便查看注册表是否有任何变化。
最后一个属性 eureka.client.service-url.defaultZone 包含客户端用于解析服务位置的 Eureka 服务的列表,该列表以逗号进行分隔。
Eureka 高可用性
建立多个 URL 服务并不足以实现高可用性。eureka.client.service-url.defaultZone 属性仅为客户端提供一个进行通信的 Eureka 服务列表。除此之外,还需要建立多个 Eureka 服务,以便相互复制注册表的内容。
一组 Eureka 注册表相互之间使用点对点通信模型进行通信,在这种模型中,必须对每个 Eureka 服务进行配置,以了解集群中的其他节点。
到目前为止,已经有一个通过 Eureka 服务注册的服务。
我们可以使用 Eureka 的 REST API 来查看注册表的内容。要查看服务的所有实例,可以以 GET 方法访问端点:
<http://<eureka service>:8761/eureka/apps/<APPID>>
例如,要查看注册表中的 service-a 服务,可以访问 http://localhost:8761/eureka/apps/service-a。
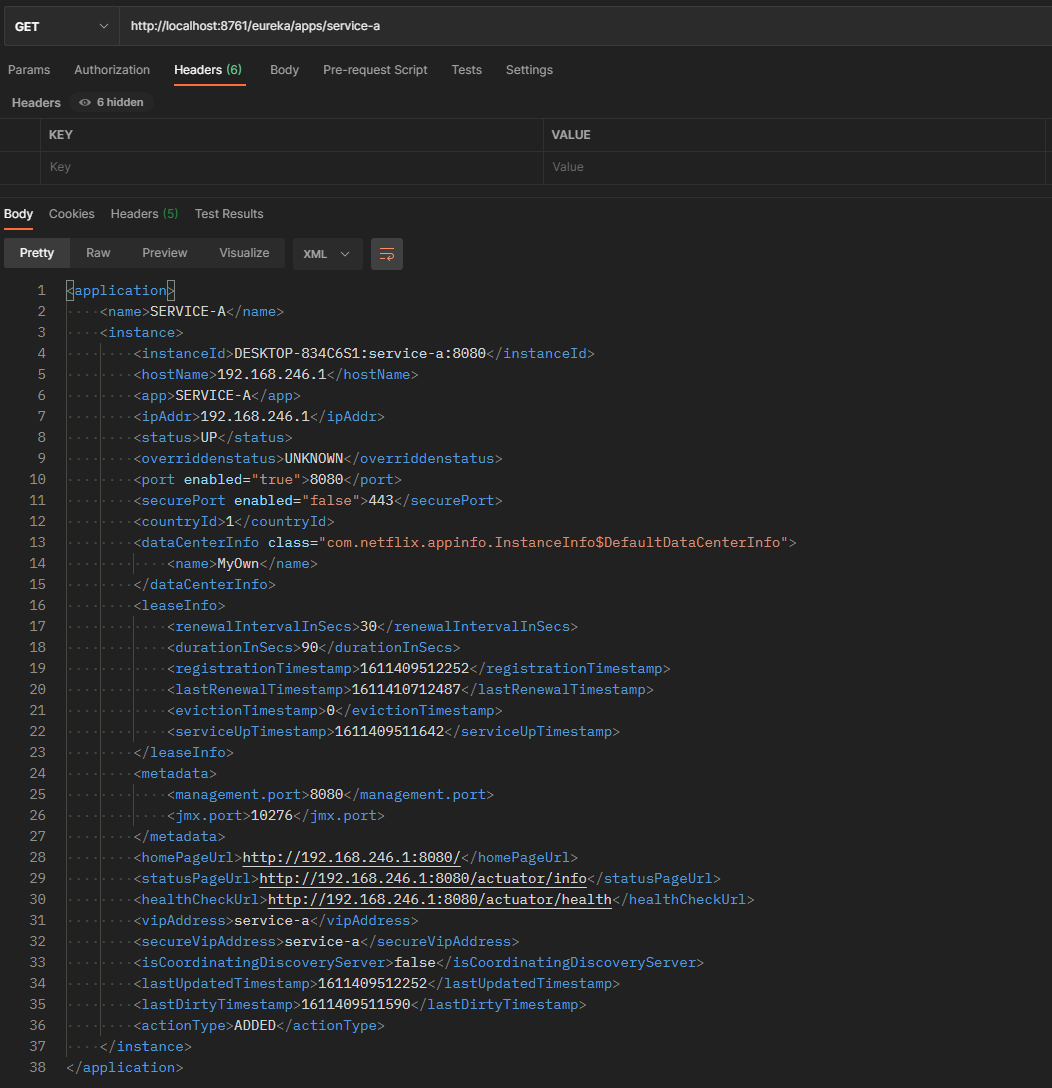
(图片来源:自己截得)
Eureka 服务返回的默认格式是 XML。将 HTTP 头部 Accept 设置为 application/json 则可以返回 JSON 格式。
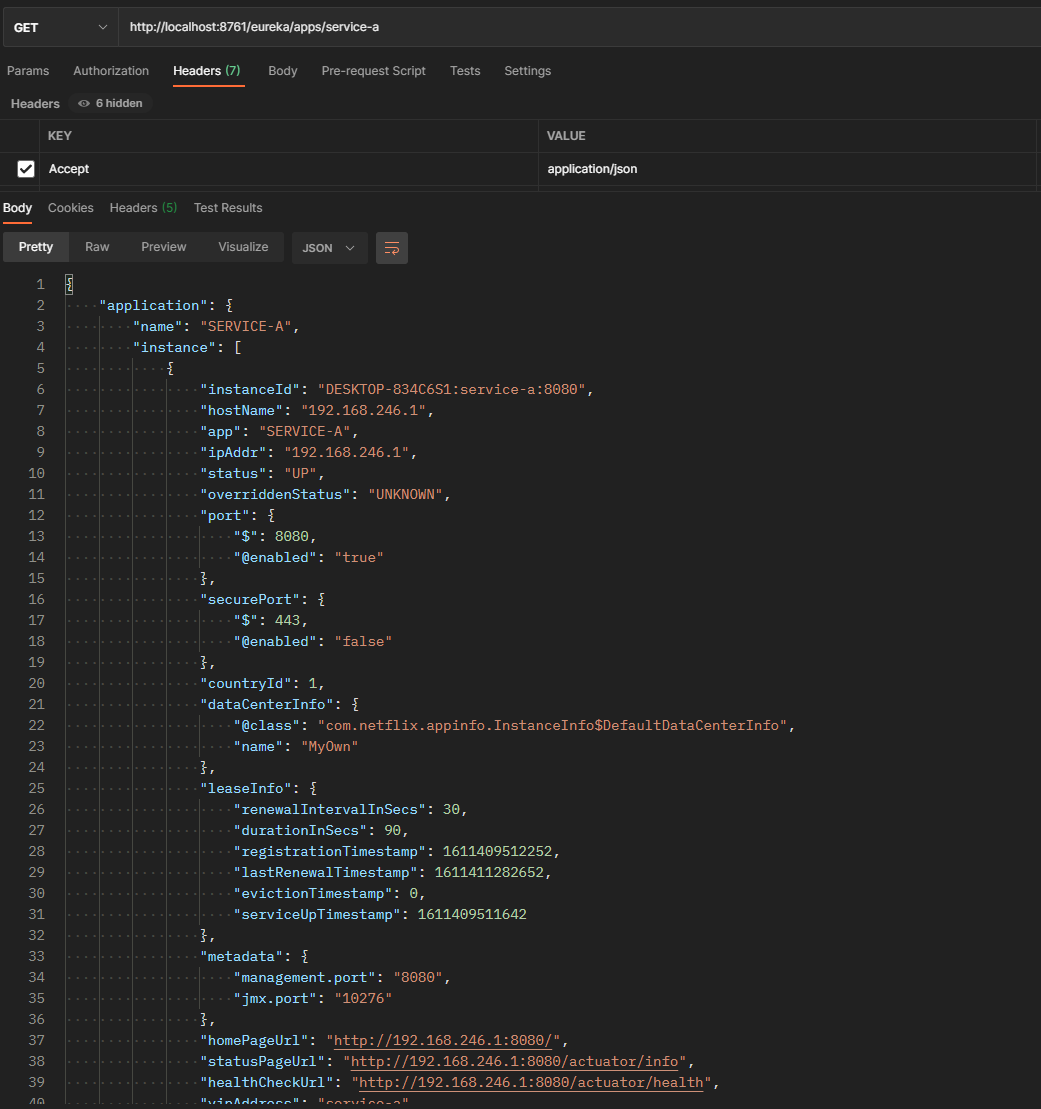
(图片来源:自己截得)
注册 service-b 服务
注册 service-b 服务与注册 service-a 类似,不同的是服务端口和服务名称:
properties
# service-b 的端口
server.port=8081

# 将使用 Eureka 注册的服务的逻辑名称
spring.application.name=service-b
使用服务发现来查找服务
现在已经有了通过 Eureka 注册的 a 与 b 两个服务。下面要做的是让 a 服务调用 b 服务,而不必直接知晓任何 b 服务的位置。a 服务将通过 Eureka 来查找 b 服务的实际位置。
为了达成目的,这里将研究 3 个不同的 Spring 客户端库,服务消费者可以使用它们来和服务提供者交互。从最低级别到最高级别,这些库包含了不同的与服务提供者进行交互的抽象层次。分别是:
- Spring Cloud DiscoveryClient;
- 启用了
RestTemplate的 Spring Cloud LoadBalancer; - Spring Cloud OpenFeign。
为了便于测试,先准备两个服务:
a 服务:
javapackage study.helloworld.springcloud.servicea.controller; import org.springframework.beans.factory.annotation.Autowired; import org.springframework.web.bind.annotation.GetMapping; import org.springframework.web.bind.annotation.PathVariable; import org.springframework.web.bind.annotation.RestController; import study.helloworld.springcloud.servicea.service.ServiceAService; @RestController public class ServiceAController { @Autowired private ServiceAService serviceAService; @GetMapping("/get/{clientType}") public String get(@PathVariable String clientType) { return serviceAService.get(clientType); } }javapackage study.helloworld.springcloud.servicea.service; import org.springframework.stereotype.Service; @Service public class ServiceAService { public String get(String clientType) { String data = null; switch (clientType) { case "discovery": System.out.println("I am using the Spring Cloud DiscoveryClient."); break; case "rest": System.out.println("I am using the Spring Cloud LoadBalancer."); break; case "openfeign": System.out.println("I am using the Spring Cloud OpenFeign."); break; default: break; } return data; } }b 服务(为了测试负载均衡,这里提供 3 个实例):
B 实例:
javapackage study.helloworld.springcloud.serviceb.controller; import org.springframework.web.bind.annotation.GetMapping; import org.springframework.web.bind.annotation.PathVariable; import org.springframework.web.bind.annotation.RestController; @RestController public class ServiceBController { @GetMapping("/get/{clientType}") public String get(@PathVariable String clientType) { return "我是 B 实例。你使用的客户端类型是:" + clientType; } }B2 实例:
javapackage study.helloworld.springcloud.serviceb2.controller; import org.springframework.web.bind.annotation.GetMapping; import org.springframework.web.bind.annotation.PathVariable; import org.springframework.web.bind.annotation.RestController; @RestController public class ServiceB2Controller { @GetMapping("/get/{clientType}") public String get(@PathVariable String clientType) { return "我是 B2 实例。你使用的客户端类型是:" + clientType; } }B3 实例:
javapackage study.helloworld.springcloud.serviceb3.controller; import org.springframework.web.bind.annotation.GetMapping; import org.springframework.web.bind.annotation.PathVariable; import org.springframework.web.bind.annotation.RestController; @RestController public class ServiceB3Controller { @GetMapping("/get/{clientType}") public String get(@PathVariable String clientType) { return "我是 B3 实例。你使用的客户端类型是:" + clientType; } }
在上述代码中,该路由上传递的 clientType 参数决定了将在代码示例中使用的客户端类型。可以在此路由上传递的具体类型包括:
Discovery —— 使用 DiscoveryClient 和标准的 Spring RestTemplate 类来调用组织服务;
Rest —— 使用增强的 Spring RestTemplate 来调用基于 LoadBalancer 的服务;
OpenFeign —— 使用 OpenFeign 客户端库来调用基于 LoadBalancer 的服务。
使用 DiscoveryClient 查找服务实例
现在来看看如何通过 Spring Cloud DiscoveryClient 调用 b 服务。
java
package study.helloworld.springcloud.servicea.client;

import java.util.List;

import org.springframework.beans.factory.annotation.Autowired;
import org.springframework.cloud.client.ServiceInstance;
import org.springframework.cloud.client.discovery.DiscoveryClient;
import org.springframework.stereotype.Component;
import org.springframework.web.client.RestTemplate;

@Component
public class ServiceBDiscoveryClient {

	@Autowired
	private DiscoveryClient discoveryClient;
	@Autowired
	private RestTemplate restTemplate;

	public String get(String clientType) {
		String url = this.serviceUrl();
		return restTemplate.getForObject(String.format("%s/get/%s", url, clientType), String.class, clientType);
	}

	private String serviceUrl() {
		List<ServiceInstance> instances = discoveryClient.getInstances("service-b");
		if (instances != null && !instances.isEmpty()) {
			return instances.get(0).getUri().toString();
		}
		return null;
	}
}
在这段代码中,注入了 DiscoveryClient。要检索通过 Eureka 注册的所有 b 服务实例,可以使用 getInstances() 方法传入要查找的服务的关键字,以检索 ServiceInstance 对象的列表。
ServiceInstance 类用于保存关于服务的特定实例(包括它的主机名、端口和 URI)的信息。
然后使用列表中的第一个 ServiceInstance 去构建目标 URL,此 URL 可用于调用服务。一旦获得目标 URL,就可以使用标准的 Spring RestTemplate 来调用 b 服务并检索数据。
RestTemplate 配置类如下:
java
package study.helloworld.springcloud.servicea.config;

import org.springframework.context.annotation.Bean;
import org.springframework.context.annotation.Configuration;
import org.springframework.web.client.RestTemplate;

@Configuration
public class RestTemplateConfiguration {

	@Bean
	public RestTemplate restTemplate() {
		return new RestTemplate();
	}
}
ServiceAService 使用 DiscoveryClient 调用 b 服务的代码如下:
java
package study.helloworld.springcloud.servicea.service;

import org.springframework.beans.factory.annotation.Autowired;
import org.springframework.stereotype.Service;

import study.helloworld.springcloud.servicea.client.ServiceBDiscoveryClient;

@Service
public class ServiceAService {

	@Autowired
	private ServiceBDiscoveryClient serviceBDiscoveryClient;

	public String get(String clientType) {
		String data = null;

		switch (clientType) {
			case "discovery":
				System.out.println("I am using the Spring Cloud DiscoveryClient.");
				data = serviceBDiscoveryClient.get(clientType);
				System.out.println(data);
				break;
			case "rest":
				System.out.println("I am using the Spring Cloud LoadBalancer.");
				break;
			case "openfeign":
				System.out.println("I am using the Spring Cloud OpenFeign.");
				break;
			default:
				break;
		}
		return data;
	}
}
将两个服务注册到 Eureka 后,访问 a 服务的接口 http://localhost:8080/get/discovery 3 次:
java
I am using the Spring Cloud DiscoveryClient.
我是 B 实例。你使用的客户端类型是:discovery
I am using the Spring Cloud DiscoveryClient.
我是 B 实例。你使用的客户端类型是:discovery
I am using the Spring Cloud DiscoveryClient.
我是 B 实例。你使用的客户端类型是:discovery
DiscoveryClient 与实际运用
在实际运用中,只有在服务需要查询 Eureka 以了解哪些服务和服务实例已经通过它注册时,才应该直接使用 DiscoveryClient。上述代码存在以下几个问题。
没有利用客户端负载均衡 —— 尽管通过直接调用
DiscoveryClient可以获得服务列表,但是要调用哪些返回的服务实例就成为了开发人员的责任。开发人员做了太多的工作 —— 现在,开发人员必须构建一个用来调用服务的 URL。尽管这是一件小事,但是编写的代码越少意味着需要调试的代码就越少。
使用带有负载均衡功能的 RestTemplate 调用服务
要使用带有负载均衡功能的 RestTemplate 类,需要使用 Spring Cloud 注解 @LoadBalanced 来定义 RestTemplate bean 的构造方法。
java
package study.helloworld.springcloud.servicea.config;

import org.springframework.cloud.client.loadbalancer.LoadBalanced;
import org.springframework.context.annotation.Bean;
import org.springframework.context.annotation.Configuration;
import org.springframework.web.client.RestTemplate;

@Configuration
public class RestTemplateConfiguration {

	@Bean
	public RestTemplate restTemplate() {
		return new RestTemplate();
	}

	@LoadBalanced // 告诉 Spring Cloud 创建一个支持负载均衡的 RestTemplate 类
	@Bean
	public RestTemplate loadBalanced() {
		return new RestTemplate();
	}
}
既然已经定义了支持负载均衡的 RestTemplate 类,任何时候想要使用 RestTemplate bean 来调用服务,就只需要将它自动装配到使用它的类中。
java
package study.helloworld.springcloud.servicea.client;

import org.springframework.beans.factory.annotation.Autowired;
import org.springframework.stereotype.Component;
import org.springframework.web.client.RestTemplate;

@Component
public class ServiceBLoadBalancedRestTemplateClient {

	@Autowired
	private RestTemplate loadBalanced;

	public String get(String clientType) {
		return loadBalanced.getForObject("http://service-b/get/{clientType}", String.class, clientType);
	}

}
启用负载均衡的 RestTemplate 将解析传递给它的 URL,并使用传递的内容作为服务器名称,该服务器名称作为从 LoadBalancer 查询服务实例的键。实际的服务位置和端口与开发人员完全抽象隔离。
此外,通过使用 RestTemplate 类,LoadBalancer 将在所有服务实例之间轮询负载均衡所有请求。
ServiceAService 使用带有 @LoadBalanced 注解的 RestTemplate 调用 b 服务的代码如下:
java
package study.helloworld.springcloud.servicea.service;

import org.springframework.beans.factory.annotation.Autowired;
import org.springframework.stereotype.Service;

import study.helloworld.springcloud.servicea.client.ServiceBDiscoveryClient;
import study.helloworld.springcloud.servicea.client.ServiceBLoadBalancedRestTemplateClient;

@Service
public class ServiceAService {

	@Autowired
	private ServiceBDiscoveryClient serviceBDiscoveryClient;

	@Autowired
	private ServiceBLoadBalancedRestTemplateClient serviceBLoadBalancedRestTemplateClient;

	public String get(String clientType) {
		String data = null;

		switch (clientType) {
			case "discovery":
				System.out.println("I am using the Spring Cloud DiscoveryClient.");
				data = serviceBDiscoveryClient.get(clientType);
				System.out.println(data);
				break;
			case "rest":
				System.out.println("I am using the Spring Cloud LoadBalancer.");
				data = serviceBLoadBalancedRestTemplateClient.get(clientType);
				System.out.println(data);
				break;
			case "openfeign":
				System.out.println("I am using the Spring Cloud OpenFeign.");
				break;
			default:
				break;
		}
		return data;
	}
}
将两个服务注册到 Eureka 后,访问 a 服务的接口 http://localhost:8080/get/rest 3 次:
java
我是 B3 实例。你使用的客户端类型是:rest
I am using the Spring Cloud LoadBalancer.
我是 B2 实例。你使用的客户端类型是:rest
I am using the Spring Cloud LoadBalancer.
我是 B 实例。你使用的客户端类型是:rest
使用 OpenFeign 客户端调用服务
OpenFeign 客户端库是声明式 REST 客户端。是 Spring 启用负载均衡的 RestTemplate 类的替代方案。OpenFeign 库采用不同的方法来调用 REST 服务,方法是首先定义一个 Java 接口,然后使用 Spring MVC 注解来标注接口,以映射 LoadBalancer 将要调用的基于 Eureka 的服务。Spring Cloud 框架将动态生成一个代理类,用于调用目标 REST 服务。除了编写接口定义,不需要编写其他调用服务的代码。
在 a 服务使用 OpenFeign 前,需要先加入 spring-cloud-starter-openfeign 依赖:
xml
<dependency>
	<groupId>org.springframework.cloud</groupId>
	<artifactId>spring-cloud-starter-openfeign</artifactId>
</dependency>
然后在 a 服务的引导类上添加一个新注解 @EnableFeignClients:
java
package study.helloworld.springcloud.servicea;

import org.springframework.boot.SpringApplication;
import org.springframework.boot.autoconfigure.SpringBootApplication;
import org.springframework.cloud.netflix.eureka.EnableEurekaClient;
import org.springframework.cloud.openfeign.EnableFeignClients;

@EnableFeignClients // 需要使用 @EnableFeignClients 以在代码中启用 OpenFeign 客户端
@EnableEurekaClient
@SpringBootApplication
public class ServiceAApplication {

	public static void main(String[] args) {
		SpringApplication.run(ServiceAApplication.class, args);
	}

}
启用 OpenFeign 客户端后,就可以定义一个 OpenFeign 客户端接口:
java
package study.helloworld.springcloud.servicea.client;

import org.springframework.cloud.openfeign.FeignClient;
import org.springframework.web.bind.annotation.GetMapping;
import org.springframework.web.bind.annotation.PathVariable;

@FeignClient("service-b") // 使用 @FeignClient 注解标识服务
public interface ServiceBOpenFeignClient {

	@GetMapping("/get/{clientType}") // 使用 @GetMapping 注解来定义端点的路径和动作
	public String get(@PathVariable String clientType); // 使用 @PathVariable 来定义传入端点的参数

}
通过使用 @FeignClient 注解来开始这个 OpenFeign 示例,并将这个接口代表的服务的应用程序 ID 传递给它。接下来,在这个接口中定义一个 get() 方法,该方法可以由 a 调用以触发 b 服务。
定义 get() 方法的方式看起来就像在 Spring 控制器类中公开一个接口一样。
a 服务使用 OpenFeign 调用 b 服务的代码如下:
java
package study.helloworld.springcloud.servicea.service;

import org.springframework.beans.factory.annotation.Autowired;
import org.springframework.stereotype.Service;

import study.helloworld.springcloud.servicea.client.ServiceBDiscoveryClient;
import study.helloworld.springcloud.servicea.client.ServiceBLoadBalancedRestTemplateClient;
import study.helloworld.springcloud.servicea.client.ServiceBOpenFeignClient;

@Service
public class ServiceAService {

	@Autowired
	private ServiceBDiscoveryClient serviceBDiscoveryClient;

	@Autowired
	private ServiceBLoadBalancedRestTemplateClient serviceBLoadBalancedRestTemplateClient;

	@Autowired
	private ServiceBOpenFeignClient serviceBOpenFeignClient;

	public String get(String clientType) {
		String data = null;

		switch (clientType) {
			case "discovery":
				System.out.println("I am using the Spring Cloud DiscoveryClient.");
				data = serviceBDiscoveryClient.get(clientType);
				System.out.println(data);
				break;
			case "rest":
				System.out.println("I am using the Spring Cloud LoadBalancer.");
				data = serviceBLoadBalancedRestTemplateClient.get(clientType);
				System.out.println(data);
				break;
			case "openfeign":
				System.out.println("I am using the Spring Cloud OpenFeign.");
				data = serviceBOpenFeignClient.get(clientType);
				System.out.println(data);
				break;
			default:
				break;
		}
		return data;
	}
}
将两个服务注册到 Eureka 后,访问 a 服务的接口 http://localhost:8080/get/openfeign 3 次:
java
I am using the Spring Cloud OpenFeign.
我是 B 实例。你使用的客户端类型是:openfeign
I am using the Spring Cloud OpenFeign.
我是 B2 实例。你使用的客户端类型是:openfeign
I am using the Spring Cloud OpenFeign.
我是 B3 实例。你使用的客户端类型是:openfeign
Spring Cloud Circuit Breaker
Spring Cloud Circuit breaker 提供了跨不同断路器实现的抽象。它提供了一致的 API 用于应用程序,允许开发人员选择最适合应用需求的断路器实现。
支持的实现:
提示
Netflix Hystrix 不再处于主动开发阶段,目前处于维护模式。
进入 Resilience4J
Resilience4j 是一个轻量级的容错库,灵感来自 Netflix Hystrix,但专为 Java 8 和函数式编程而设计。轻量级,因为库仅使用 Vavr,它没有其他外部库依赖项。相比之下,Netflix Hystrix 具有对Archaius 的编译依赖关系,而 Archaius 具有更多的外部依赖,例如 Guava 和 Apache Commons Configuration。
在 Spring Cloud 中使用 Resilience4J 前,需要先加入 spring-cloud-starter-circuitbreaker-resilience4j 依赖:
xml
<dependency>
	<groupId>org.springframework.cloud</groupId>
	<artifactId>spring-cloud-starter-circuitbreaker-resilience4j</artifactId>
</dependency>
Resilience4J 默认是自动配置的,可以通过设置 spring.cloud.circuitbreaker.resilience4j.enabled 为 false 来禁用自动配置。
当然,也可以为 Resilience4J 提供一个全局的配置:
java
package study.helloworld.springcloud.resilience4jcircuitbreaker.config;


import java.time.Duration;

import org.springframework.cloud.circuitbreaker.resilience4j.Resilience4JCircuitBreakerFactory;
import org.springframework.cloud.circuitbreaker.resilience4j.Resilience4JConfigBuilder;
import org.springframework.cloud.client.circuitbreaker.Customizer;
import org.springframework.context.annotation.Bean;
import org.springframework.context.annotation.Configuration;

import io.github.resilience4j.circuitbreaker.CircuitBreakerConfig;
import io.github.resilience4j.timelimiter.TimeLimiterConfig;

@Configuration
public class Resilience4JCircuitBreakerConfiguration {

	@Bean
	public Customizer<Resilience4JCircuitBreakerFactory> defaultCustomizer() {
	    return factory -> factory.configureDefault(id -> new Resilience4JConfigBuilder(id)
	    		.timeLimiterConfig(TimeLimiterConfig.custom().timeoutDuration(Duration.ofSeconds(3)).build())
	    		.circuitBreakerConfig(CircuitBreakerConfig.ofDefaults())
	    		.build());
	}

}
在上面的代码中,我们配置了一个 Resilience4JCircuitBreakerFactory 工厂。将 Resilience4J 的超时时间设置为 3 秒(默认是 1 秒),其他配置保持不变。
Spring Cloud 提供了抽象的 CircuitBreakerFactory 工厂,可以让我们使用统一的调用方式来使用不同的断路器实现(例如 Resilience4J)。
下面是一个例子:
java
package study.helloworld.springcloud.resilience4jcircuitbreaker.controller;

import org.springframework.beans.factory.annotation.Autowired;
import org.springframework.cloud.client.circuitbreaker.CircuitBreakerFactory;
import org.springframework.web.bind.annotation.GetMapping;
import org.springframework.web.bind.annotation.PathVariable;
import org.springframework.web.bind.annotation.RestController;

@RestController
public class Resilience4jCircuitbreakerController {

	@Autowired
	private CircuitBreakerFactory<?, ?> circuitBreakerFactory;

	@GetMapping("/delay/{seconds}")
	public String delay(@PathVariable int seconds) {
		String prefixMsg = "本次调用接口花费了 " + seconds + " 秒钟。";
		return circuitBreakerFactory.create("delay").run(() -> {
			try {
				Thread.sleep(seconds * 1000);
			} catch (InterruptedException e) {
				e.printStackTrace();
			}

			String msg = prefixMsg + "成功了!";
			return msg;
		}, t -> {
			t.printStackTrace();

			String msg = prefixMsg + "超时了!";
			return msg;
		});
	}
}
在上面的例子中,注入了一个 CircuitBreakerFactory 实例,通过 CircuitBreakerFactory 创建了一个名为 delay 的 CircuitBreaker 实例。它的 run 方法需要一个 Supplier 和一个 Function。Supplier 是要包装在断路器中的代码。Function 是断路器跳闸将执行的后备功能,它将传递导致触发回退的 Throwable。
简而言之,这有点像定时版的 If-Else(当然更强大)。
启动服务后,访问 http://localhost:8080/delay/{SECONDS} 进行测试:
sh
$ curl -s http://localhost:8080/delay/2
本次调用接口花费了 2 秒钟。成功了!

$ curl -s http://localhost:8080/delay/4
本次调用接口花费了 4 秒钟。超时了!
Spring Cloud Gateway
Spring Cloud Gateway 旨在提供一种简单而有效的路由到 API 的方法,并为其提供跨领域关注点,例如:安全性、监视/指标和弹性。
在使用 Spring Cloud Gateway 前,需要先加入 spring-cloud-starter-gateway 依赖:
xml
<dependency>
	<groupId>org.springframework.cloud</groupId>
	<artifactId>spring-cloud-starter-gateway</artifactId>
</dependency>
如果已经添加了依赖,又不想启用网关,可以通过设置 spring.cloud.gateway.enabled 为 false 来禁用。
Spring Cloud Gateway 支持两种方式的配置:配置文件和编写代码,两者的效果相同。下面是一个示例:
配置文件
propertiesserver.port=9999 spring.cloud.gateway.routes[0].id=hello-gateway-route spring.cloud.gateway.routes[0].uri=http://localhost:8080 spring.cloud.gateway.routes[0].predicates[0]=Path=/hello编写代码
javapackage study.helloworld.springcloud.gateway.config; import org.springframework.cloud.gateway.route.RouteLocator; import org.springframework.cloud.gateway.route.builder.RouteLocatorBuilder; import org.springframework.context.annotation.Bean; import org.springframework.context.annotation.Configuration; @Configuration public class GatewayConfiguration { @Bean public RouteLocator customRouteLocator(RouteLocatorBuilder builder) { return builder.routes() .route("hello-gateway-route", r -> r.path("/hello") .uri("http://localhost:8080")) .build(); } }
上面的示例表示创建一个 id 为 hello-gateway-route 的路由,将路径为 /hello 的请求转发到 URI 为 http://localhost:8080/hello 的地址上面。
http://localhost:8080/hello 的 Controller:
java
package study.helloworld.springcloud.gateway_demo_service.controller;

import org.springframework.web.bind.annotation.GetMapping;
import org.springframework.web.bind.annotation.RestController;

@RestController
public class HelloController {

	@GetMapping("/hello")
	public String hello() {
		return "Hello, gateway! I am from gateway-demo-service.";
	}
}
启动服务后,访问网关地址 http://localhost:9999/category/java:
sh
$ curl -s http://localhost:9999/hello
Hello, gateway! I am from gateway-demo-service.